Pages

Monday, March 30, 2009

Easter Wishes


Over the weekend, I finally made a few cards with the "God's Beauty" set which is a Level 1 Hostess set in the Spring Stampin' Up! catalog. We have two friends in far away cities (Seattle and London) who we don't connect with nearly often enough. They are both recent widows having lost their husbands of over 50 years. Since they are both avid gardeners and lovers of Spring, I think this is a nice time to touch base and send a little cheer their way. The inside message is "Beauty is God's handwriting."

I used Stampin' Pastels to color in the wings of the butterfly. We did a 3D butterfly like this in our last Stamp Club. It is easy and very effective.

Ingredients: Stamp Sets all by Stampin' Up! God's Beauty and All Holidays for the greeting.
Inks: Orchid Opulence, Green Galore, Black
Ribbon: Black gingham also from Stampin' Up!

Sunday, March 29, 2009

The Joys of Do-it-Yourself


Last year, I decided I’d had enough of my pink bathroom. The pink wallpaper was chosen to match the fabrics my stepdaughters had selected for their bedroom. This decision was made in 1992 when the girls were teens and I had not yet overdosed on pink. Actually I always thought this bathroom was a little much but I dreaded working in such a tight space.

Finally late last summer, I started with one corner, just to see how easy or difficult it would be to remove. A word of warning: If you aren’t really ready to take down wallpaper, NEVER peal back that first corner. Good or bad, you just can’t stop. My pink paper was a coated paper meaning the top layer peels off quite easily; the second layer, not so much. I wet and scrapped strips of paper off the walls a section at a time for weeks. Finally, blank walls appeared – a ready canvas for something new.

I love color and I had purchased the floral fabric for the shade and shower curtain a couple of months earlier. A light, bright blue is enough of a change from the pink for me. I still wanted a happy room. I did make one – ah, mistake. I selected 3 potential blue paint chips and asked my husband to make the choice. I wanted him to be part of the process. He picked the one I liked the least (this is sort of how I got a pink bathroom to start with, but that is another story.) I bought a quart and did a test patch behind the mirror. Voila! Carolina Blue. Now, no offense to any sports fans, but that isn’t what I had in mind. So I mixed in grays and other shades of blue until I found a combo I liked. Back to the paint store and the perfect color (my favorite to begin with.)

I framed three old photos I scanned, enlarged and printed of my father, my grandparents with my cousin Donna, and my Mother with me in matted frames that I hand stamped.

I love our updated bathroom and I’m especially proud that I did it myself. Never will I say that I did as good a job as a professional painter, but it is my little project and I’m proud of it.

The next project is the downstairs bath and while I may strip the wallpaper myself (I have not tested a corner yet), I won’t be hanging the new paper. Some jobs definitely call for a professional. Oh, and I think I’ll be going with my own instinct on shades of color.

Saturday, March 28, 2009

Color Challenge - Tangerine & Saffron


Kristina Werner's color challenge this week is to use Tangerine Tango, So Saffron, Chocolate Chip and Whisper White. This was particularly challenging to me since I'm not really an orange person. I was going for a a modern look but I think the brown gingham ribbon makes this a more traditional card than I expected.

Once again Petal Pizzazz creates interesting embossed flowers. Using the discontinued "Make it Count" stamp set (which was a hostess set last year) for the words creates a perfect sentiment for a good graduation card. A bonus is I finally used one of those little chipboard circles!

Ingredients: Stamp Sets: Make it Count and Petal Pizzazz from Stampin' Up!
Paper: Chocolate Chip, So Saffron and Tangerine Tango cardstock
Ribbon: from Paper Studio
Ink: Chocolate Chip and Whisper White craft ink
Other: Clear embossing powder.

Friday, March 27, 2009

Scrap Happy


There is a reason we call it "scrap" booking. And you can apply the same logic to cards. You will create lots of scraps and you can use scraps of almost anything in creating paper art.

This week I took a few of the scraps from one of the Sale-a-bration items - the paper pack and ribbon bundle- and created a couple of cards. I hadn't done much with "A Little Birdie Told Me"- a fun set that covers almost every occasion.


Also, I got back to my chipboard challenge trying to figure out what to do with some of the simple shapes. I took two different sizes of squares, cut them in half diagonally and then notched out a corner to create these "corners." The craft and rubber scissors are great for cutting chipboard. Now if I can just figure out a good use for all those little chipboard circles...


Ingredients: Stamp Sets: A Little Birdie Told Me, Define Your Live, Congrats
Paper: Sale-a-Bration designer paper, Bashful Blue cardstock. I think Beige cardstock is Creative Memories
Embellishments: Ribbon and Chipboard from Stampin' Up! except "C" which is from my stash and source unknown.
Button: Source unknown.

Tuesday, March 24, 2009

Happy Birthday, Mother!


Happy Birthday to my Mother today! When I saw a version of this pocketbook card on Splitcoaststampers.com, I knew I had to make one for my mother who has a passion for fashion. The original was from Tara Kieninger at http://www.firefliesandflutterbyes.com/. Her version had a strip of cardstock across the body of the card and featured the Kindred Spirits set.


For my version, I used black paper, gold embossing and added a silk flower and several clear rhinestones. My Mother loves black and gold. The red silk flower gives it a little punch. I glued some old velcro that wasn't too 'grabby' on for a closure and typed up her sentiment on vellum for the inside. The ribbon handle is secued through large grommets in the back.


I made another version of this for the Red Hats using purple paper and a red flower. For the inside, I attached a cellophane bag filled with chocolates. I look forward to using it as a demo item at workshops.
.

My Mother is a very creative and stylish woman. My parents started a retail business when I was 4 and as the business grew, Mother spent more of her time working with customers, handling bookkeeping not to mention taking care of a daughter and being chauffeur to her own Mother and Mother-in-law, neither of whom drove. I don't know how she did it.
.

Before the business, she took some time to create projects for our home. A few months ago I found two large framed needlework pieces she did. But the most memorable object she made during my childhood had to be the book cover. When I started first grade after almost no association with other children, I was certainly an outsider. The teachers sent home our textbooks for us to create some sort of protective cover. Most parents opted for the brown paper bag cover. Not my Mother. One of the books had a red binding with a design printed on it - some flowers I think, plus the title of the text. She took some red polyester fabric and made a dust jacket for the book. She also embroidered the same designs and words as the real cover on the dust jacket. My teacher was so impressed she took the book down the hall to show all the other teachers what my creative, talented Mother had done. It was the first time I remember being proud of my Mom but it certainly wasn't the last.
.

Today Mother's creativity is exercised in her beautiful home and gardens. We went to purchase more pansies in the pouring rain this morning. Tomorrow we are off to find all weather fabric for outdoor cushions. That's my mom, making everyday things beautiful.


Ingredients: Black cardstock and ribbon - source unknown. Gold paper from Stampin' Up!
Stamp set: Baroque Motifs for the flourish and One of a Kind for the sentiment.
Inks and Embossing powder from Stampin' Up!

Gift Card Holder


Spring brings with it new flowers, green grass, weddings and graduations. Often we don't know what to give or we know the recepient would appreciate picking out their own gift - thus the wonderful option of the gift card. (Be sure to pick companies you have faith in as gift cards are void if the company files for Chapter 11 even if they keep the doors open.)


We made this Spring inspired gift card holder at a workshop on Saturday. Use the slit punch on the inside as the perfect accessory to create the half circles that hold the gift card in place.


Ingredients: All from Stampin' Up! Stamps: Petal Pizzazz, Congrats
Designer paper and ribbon from the Sale-a-bration catalog
Bashful blue and So celery cardstock. Bashful blue and Close to Cocoa Ink.

Sunday, March 22, 2009

Choices


I love having choices. One thing I learned early on in my design business is that not everyone is like me. Funny, I'd been preaching that for years as a corporate trainer that we should treat eveyone the way they want to be treated, not the way we want to be treated. So I've had to learn that some people want to see every possible choice of fabric, trim, etc and others want a more limited selection. Some people make really fast decisions and some, like me, need to think it over.


Since I like having choices and have trouble making up my mind, I can never seem to make too many of the same card. Even when I set out to make a dozen of one kind of card for my stash or for gifts, I start altering them a little, trying a different color combination, adding an embellishment, moving things around.


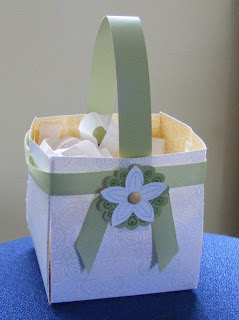
The card on the left above was my first try at this card. I used the Petal Pizzazz stamp set (yet, again!) for the flower because the other sets I wanted were on order. When those sets came in, did the card again as shown on the right. I altered the bottom edge too opting to try a stamped scallop at the very edge and then one offset some so the card could be made from 8 1/2" x 11" paper. Then when it came time to do the workshop using this card, I offered my attendees a choice - stamp a design for the center of the flower or use a button. Many chose to make one card with the button and their second with the stamped design. They also alternated their choices of scallops or not.


See, everyone likes choices after all!


Ingredients: All from Stampin' Up! Petal Pizzazz Stamps, All Holidays, Polka Dot Punches (SAB 2009)
Paper: Tangerine Tango, Pacific Point, Whisper White, a designer paper from about a year ago that looked really good with this
Inks: Baja Breeze, Pacific Point
Ribbon: Pacific Point striped

Friday, March 20, 2009

Welcome, Spring!!!


Finally! Spring has arrived on a beautiful day here in North Carolina. We planted the first 20 of our over gladiolus bulbs on St. Patrick's Day. Our cannas are already peeking out of the ground as well as some peonies Lenny transplated from my Mother's garden. (Lenny just warned me their is a frost warning for tonight so we better cover these little shoots up.) I love flowers I can cut and bring indoors.


With spring, not only do we get green grass and blossoms, we get many occasions to celebrate. Spring often brings weddings and graduations. I'm planning to demo this card at a workshop tomorrow. I borrowed the design from the Sale-a-bration catalog. Their version had an accordion flower but I wanted a stamped one. I've used the Petal Pizzazz set for the flower and stem. The graduated color is achieved with Stampin' Pastel. Quick and very effective.


To my dear friends, Karen and Jimmy, Happy Anniversary and a Happy Spring to all!


Ingredients: Stamps: Petal Pizzazz and Congrats from Stampin' Up!
Ink: Close to Cocoa, Bashful blue, Stampin Pastels
Button: Button Bouquet in Baja Breeze
Paper is from the Sale-a-bration paper pack and Kraft cardstock. Ribbon is Certainly Celery also from Sale-a-bration.

Thursday, March 19, 2009

Winter Finale

At our house, we have been so anxious to see tomorrow come and along with it the arrival of spring, that we forget what today is. Today is the last day of winter. And this winter we finally got the snow I've been missing for several years. The scene above is from our backyard less than 3 weeks ago.
I love Spring; it is my favorite season. But someone famous once said that if we didn't have winter to live through, we wouldn't enjoy spring so much. How true!

Wednesday, March 18, 2009

Hats off to Place cards

Creating cards is only just one type of paper craft. This morning a window treatment customer told me about her plans for a Red Hat luncheon. "I wish I had some placecards," she said. She had some really adorable goodies to go at each place setting but lacked the cards. I offered to make them for her. With one sheet of 12x12 paper, one stamp set and about a half hour, I designed and stamped 9 cards with red flourishes and purple embossed designs. I added clear rhinestones to the ones I made for her, but I kept my sample without rhinestones. I'm not sure which I like better. What do you think?

Hint: While Elegant Eggplant is probably a closer purple to the Red Hat color, I used a lighter shade of purple on the red paper to get it to show up purple when embossed.

Ingredients: Stamp Set - Baroque Motifs by Stampin' Up!
Red paper - source unknown
Ink: Riding Hood Red and Lovely Lilac from Stampin' Up!
Clear embossing powder also by Stampin' Up!

Tuesday, March 17, 2009

Sad times

Unfortunately, lately I've been needed far too many of these types of cards. I'm not alone, one of the participants in my Stamp-a-Stack said we needed to do sympathy cards next time. Are we just at that age? Maybe, but sadly, I've been losing friends from my own age on through their 80's in the last year.

Amid the sadness and loss, I try to think about what my friends and family meant to me. In the last year, I've lost three people who taught me a great deal that I use every day to make my life more enjoyable and more productive. My aunt, who passed away in December, spent countless hours during my childhood teaching me - or trying to as I wasn't the most patient student - how to cook, sew, quilt and do other crafts. I even learned to make baskets out of pine needles under her eye. She loved crafts and created decorative and useful items throughout her life. One of the ministers commented on it during her funeral. He said, "She always gave everything away to others. She didn't keep things for herself." He was absolutely right and I'd never noticed that before. She gave of her time and her talents to make other people's worlds more beautiful.
A friend who lived well into her '80's passed away last summer. Nan taught me to crochet when I was in the 6th grade and for years I went to her house weekly to learn new patterns. She taught so many others, too. Crafts were also a valuable part of her life. At her funeral I learned how much she gave of herself to the care and education of others and I marveled at the packed church. While she didn't have any children of her own, she had a large extended family. But many in the church were not relatives and came to the service on the beautiful 4th of July weekend to pay tribute to a woman who inspired them.
What really made me think about all this more was this past weekend we lost a former boss of mine and a friend. Plato didn't teach me to make things; he taught me about building relationships. His thriving business sold and installed a product yet he believed it was all about people. He had a passion for his business and it showed in everything he did. He took care of his employees and had a chivalry that we often joke is extinct. Even though I grew up in a family business, worked for many years a Fortune 500 subsidiary, and have run my own businesses, I apply the lessons I learned from him daily.
I can only hope that these fine people gained a little something from their relationship with me as well. And thinking about what their lives meant to me reminds me of the importance of sharing our knowledge and our concern with others.
Maybe I do need to make more sympathy cards but what I really need to do is send more "Thinking of You" cards.

Saturday, March 14, 2009

Searching for Beauty

I had hoped to come back from Florida and post a great shot of the Space Shuttle Discovery's night launch on Wednesday evening. We were in Florida at Kennedy Space Center on Wednesday, but the launch had to be delayed. Of course we were disappointed but the safety of the astronauts is paramount. A fuel leak was discovered and they scrapped the launch just hours before it was scheduled. We did get to complete our tour of the space center and decided not to stay in Florida until Sunday when the next target date is. I hated I couldn't make Lenny's dream of seeing a launch come true.

This was an unusual trip for us. We seldom have a scheduled event as the focus of our trips, much less one that required great flexibility (Apparently,8 different launch dates in a month is my flexibility limit.) We typically pick a place, a good time of the year for traveling to that location, and make plans from there. We seek out places of natural beauty, usually national or state parks and we both enjoy museums. Lenny prefers science or history museums and I like the arts, particularly decorative arts or American art. I got to see both of my favorites on this trip. I'm pictured here in front of an early 19th century desk at the Lightener Museum 
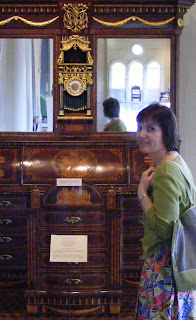
in St. Augustine. This may be the first museum where we were allowed to take photos! Mr. Lightener published a magazine called Hobbies in Chicago in the early part of the 2oth century. He was a collector and because of his magazine had many collecting passions. During the searly days of the depression, he bought many items for pennies on the dollar. He purchased an old hotel building that had gone into bankruptcy during the depression to house his collection and donated the entire thing to the city of St. Augustine. It is astounding the array of items he collected. Glass, porcelean, furniture, cigar bands, musical instruments. We had a fun morning exploring museum contents housed on the floors of the building which was used for the hotel spa - one that would rival any fancy spa today.

The other museum we visited was the Morse Museum of American Art in Winter Park (Orlando). Housing the largest collection of Tiffany's work, both glass and paintings, it was a stunning tour. If you are ever in Orlando, it is more than worth an hour or two. Plus Winter Park houses quaint little shops amid its tree lined residential streets.

The photo at the top is from the Washington Oaks State Park along the Atlantic coast north of Daytona. It is one of 3 we visited. Ravine Gardens' focus is azaleas which were in full bloom.

Florida is better known for racing, sunbathing and theme parks. And we've certainly done more than our share of theme parks over the years. But true beauty is easy to find too. (And a good deal cheaper than Disney).

Saturday, March 7, 2009

Petal Pizzazz - Act 1, Scene 2


Petal Pizzazz from Stampin' Up! is definitely one of my favorite sets. We made this card in my Birthday Stamp-a-Stack this week. At a Stamp-a-Stack you make 10 cards - 2 each of 5 different designs. The cost includes all the card materials and envelopes. It is a great way to explore stamping and also go home with a bunch of cards.

This card also featured the new Fifth Avenue Floral set to stamp the whisper white ink on the gray paper. Using an open design like these flowers to stamp white on a dark color creates a unique backdrop for the flowers and leaves. Stamp the same flowers with darker colors on a light background to simulate your own custom pattern paper.

I'll have more Stamp-a-Stacks coming up so visit again for an upcoming class schedule or e-mail me at lynnelisa@bellsouth.net.

ingredients all by Stampin' Up!: stamps: Fifth Avenue Floral, Petal Pizzazz and All Holidays for greeting
Colors: Whisper white, Baja Breeze, Kiwi Kiss, Basic Gray
Paper: Basic Gray and Kiwi Kiss
Ribbon: Baja Breeze striped grosgrain and black/white 3/16" gingham.
Button: From Button Bouquet. For the Stamp-a-Stack we stamped a Kiwi Kiss design from Little flowers and punched it with the 1/2" circle punch for the center in place of the button.

Friday, March 6, 2009

The BFF of all colors


I’ve been working this afternoon on pulling together some companion fabrics for a master bedroom. My client has narrowed her fabric choices to two beautiful fabrics in the blue/green and mocha families. One of her fabrics is more blue and one, more green. So all the companion fabrics go with one or the other but not both. Choosing one ensemble over the other is going to be a tough decision.

As I was working with these colors I got to thinking about how the shade of green we are considering in one fabric has been popular several times over the last 15 years or so. Blue is really coming back now and not just the Robin’s Egg blue of the last few years. All shades of blue are showing up in bedding and fabrics. I recently received a clothing catalog with a great deal of navy and other shades of blue. What makes colors work again and not make us go “Eew, I don’t want ___ color, I had that years ago”? Well, sometimes we do say that. But I think the trick is what the color is paired with. The green we are considering was paired with burgundy and darker greens in the early 90’s. Blues used to be paired with mauve or, as in my first apartment, peach. Brown is the BFF for every color today. Pair anything with brown and it looks warm, sophisticated, fresh, comfortable, whatever you want it to be.

Another thing about brown is how it works as an architectural accent. A few years ago we might put a black wrought iron light fixture in a house and maybe a black fireplace screen and they looked great. Nice neutral, not too heavy. Today, we have wrought iron banisters, light fixtures, and wall decorations. The accent color we choose for these items has to support our other colors and not overpower. Brown often fits that bill. Plus you can paint one or more walls brown. Try that with black or gray.

Black may be coming back but I don’t see brown going away for a long time. (Maybe I’d better look a little harder for the perfect brown handbag.)

Thursday, March 5, 2009

Cute Easter Basket


I've been going on and on about how much I love making cards and scrapbook pages using Stampin' Up! stuff. If you would like to try this fun hobby for yourself, a great way is to host a workshop. At a workshop you and your guests get to make at least two items. I demo a few things beforehand so you can see how stamping works. The cute little basket above is one of my demo items for March workshops. Hostesses get to keep all items I make during the demo. I adapted this little basket from an idea from Stampin' Up! and combined it with one I saw in the most recent issue of Scrapbooks, Etc. magazine. It was obvious from the magazine photo that they had hand cut the holes for the ribbon but Stampin' Up! sells a neat little punch that punches both ribbon holes at once making this a very fast as well as adorable project.

All the materials for the basket are Stampin' Up! and many are from the Sale-a-bration catalog. During February and March, for every $50 a hostess or workshop guest spends, they get to choose one of the free stamp sets, the paper pack, or the ribbon bundle from the Sale-a-bration catalog. There are other special perks for hostesses this month as well as the regular stuff a hostess can earn.

If you live in NC foothills and would like to invite a few friends over for a fun evening, e-mail me at lynnelisa@bellsouth.net. I can customize what I demo to your and your guests tastes.

My personal feelings about home parties is that people should come if the product interest them and only buy if they know they are going to get a good benefit from the products. It is my job to explain what Stampin' Up! offers but I'm definitely a low key salesperson. For me, it is all about crafting, creating and having fun.

Basket ingredients: Stamps: Dots and Punches from 2009 Sale-a-Bration
Ink: So Celery, Bashful Blue
Paper: Double sided pattern paper from 2009 Sale-a-Bration, So Celery Cardstock
Ribbon: So Celery from 2009 Sale-a-Bration ribbon bundle

Wednesday, March 4, 2009

Caught!


Oops! Note to self: When I make a card for my husband, put it away! My dear hubby came upstairs a couple of days ago and I was showing him some cards I'd made for a Birthday Stamp-a-Stack this week. He pointed behind them at this card and said, "I really like Kindred Spirits." What he didn't know was it was supposed to be for our anniversary. Oh, well, that is months away so I'll have to make something else. What are the odds he would pick out the one card out of about 8 on my worktable made for him? Just a coincidence or are we really Kindred Spirits (Ok, that's corny but true)?

Anyway, this is also my chipboard challenge effort for the week. I used a Stampin' Up! chipboard frame and glued pearls in the little holes normally used for brads. The frame was inked in Ballet Blue and sponged with a little Whisper White. The real feature of this card is the emboss relief technique with pastels in a variety of the blue and green shades. This technique produced dramatic results quickly.

Ingredients: Stampin Set: Kindred Spirits by Stampin' Up!
Inks: Ballet Blue, Whisper White, a variety of Stampin' Pastels
Ribbon: Unknown source

Monday, March 2, 2009

Loads of Love


"Loads of Love" is a Stampin' Up! set that has been around for awhile but it is new to me. I often choose flowers and more formal sets over the cuter sets. When I get something like this though I just love it. I know a lot of men in my life will enjoy the cards I can make with this little truck stamp. The accessories stamps that go with it make it a true all occasion set.
The card above uses colors from Kristina Werner's color challenge: Chocolate chip, Pumpkin Pie, Ruby Red, Brocade Blue and Old Olive. This is my first effort at one of her challenges and I enjoyed making the card. Many of the colors would be standard choices for Loads of Love, but I wouldn't have thought to throw in Pumpkin Pie with the red color.

Sunday, March 1, 2009

Snow Idiots

Yes, that's me and we have snow! Lenny and I took a walk through the woods this afternoon after I finally found my snow boots. I haven't needed them in 5 or 6 years. I certainly needed them today as it was more mud and cold wind than snow going through the woods to my parents house where we delivered freshly baked chocolate chip cookies.

It's been a great day starting with making some fun cards I'll have posted tomorrow. After lunch I baked cookies with Lenny's help stirring up the dough (and eatting up the crumbs). We enjoyed watching the big white flakes coming down. While there isn't that much yet, we are expecting more tonight.
Related Posts Plugin for WordPress, Blogger...