Pages

Saturday, September 29, 2012

Happy Mail


When I picked up our mail accumulated during our trip, I found some 'happy mail' from Kelly Rasmussen over at KR Creations blog.  I won this great set of Basic Grey summery stamps.  I loved the way she decorated the manila envelope with stamps and Washi tape.  So clever and inviting.  Thanks, Kelly!


I've already put the new set of stamps to use to use on the card above. I stamped some of the basic designs tone-on-tone on cardstock and punched with a 3/4" punch for a border.  The pinwheels were inked with a regular ink pad and then colored in with a darker marker over part of the design before stamping.  I did a couple of these for my OWH box.

Thanks for stopping by!  Be sure to check out Stamptember over at Simon Says Stamps blog.  They have some great projects and videos.

Friday, September 28, 2012

Our Mountain


Hi!  We just returned from a beach trip and one of the first things I noticed when we got back into our neighborhood was the leaves just starting to pick up a bit of gold.  It will still be several weeks yet before our mountain changes color as it shows here in a photo from last November.

We don't live on this mountain or own land there but it is right out our front windows.  I grew up practically at the foot of the mountain so it has always been part of my life.  The view in the photo is actually taken just a ways down the road with a neighbor's barn in the foreground.  From this angle, it really doesn't look all that high.  Trust me, around here, this is a mountain!

Depending on where you live, you might consider this just a hill or it might seem huge.  It is really the last of the foothills in NC.  From the other side of this mountain, there really is nothing but hills and lakes all the way to Charlotte over 60 miles away.  So tucked in here behind our mountain, we get lousy TV reception but beautiful views of the seasons.

There has been a little clearing and there is now a cell tower on top but really not that much change.  Our side is pretty steep and most of the land was owned by a lady who lived into her late 90's.  The land has changed hands a couple of times in the last 10 years or so since she passed but so far nothing much has happened.  We hope it stays just like it is.


For the layout, I used some new Simple Stories Harvest Lane papers.  I've been looking for a fall collection to replace one from Stampin' Up! and the Basic Grey Indian Summer collections that proved so versatile.  This one doesn't quite have the pizzazz of Basic Grey yet ironically it is more 'basic.' with prints that work for fall or really about anytime of year.

I took a trick from Sue's blog and did some stitching around the papers to add some interest and tie the two sections of pattern paper together.


The bottom border is stamped with a Stampin' Up! wheel stamp.  I can't remember the name.  It goes with Trendy Trees.  I used some of those stamps on the page stamped on the October Afternoon label.  A few buttons complete the visual triangle.

Well, a long list of to-do's today.  Thanks for visiting!

Tuesday, September 25, 2012

Birthday Pear Card


It's Tuesday and I'm afraid I'm tipless today.  Here is a fall oriented birthday card.  Well, at least I'm finally in the right season :-)

The stamped image is from Stampin' Up!  I used watercolor crayons and blender pen for the color.  I've been wanting to combine this image with the Pyrus paper from Basic Grey.

Thanks for stopping by!

Sunday, September 23, 2012

First Blooms


Hope everyone in the northern hemisphere is enjoying the first weekend of autumn.  And I have a spring layout for you.  The other day it was a Christmas card.  Boy, do I have my seasons mixed up.

I made this as I was awaiting an order of fall related product from Two Peas.  I knew once the new stuff came I'd keep putting these photos aside.  They are actually very good photos for me.  I'm not a particularly great photographer mainly because I lack patience.  :-(

The die cut background was done on the Cricut from some Basic Grey Sweet Threads collection.  The journaling tag is also cut on the Cricut but just out of white cardstock I'd printed on.  I used distress ink and a background stamp to give it a little interest.

Thanks for stopping by!


Thursday, September 20, 2012

Washi Tape on Journal


Hi!  Today I have a new journal cover.  I like to keep my journal covers flat so I can turn the cover back and have a smooth writing surface.  So what better embellishments than Washi tape and stickers?


This week's challenge at Simon Says Stamp is to create a project using Washi.  I have been into basket weaving paper strips for pages so I thought I'd give basket weaving with Washi a try.  It was very simple thanks to how easy it is for Washi tape to be pulled up and repositioned.  I've added just a few strips to the top of the journal cover for balance.


Some stickers finish off cover.  I'll leave the label sticker empty until I have dates or a specific subject for this journal.  I hope this Washi craze goes on.  There are so many uses for this product.

Thanks for stopping by today!

Ingredients:  DSP:  K and Company
Washi:  Birds Indie Chic My Mind's Eye; Yellow starburst by Freckled Fawn; Gray and White diagonal by Love My Tapes
Label Sticker:  October Afternoon
Letter stickers:  old collections from OA, Basic Grey and American Crafts

Wednesday, September 19, 2012

Snow early, I know


It is just nearly fall and I'm already looking to Christmas!  I make about 80 or 90 cards for myself and family each season so I've got to get an early start.  I did a few of these to send out myself.

The cute little penguin is an Inkadinkado stamp from the dollar store.  I cut SNOW on the Cricut using the Plantin Schoolbook cartridge.   The background Naturals White paper from Stampin' Up! is brushed with some blue pastels and then stamped and embossed with snowflakes.

This will be a pretty flat card for mailing so I an keep the postage down.

Thanks for visiting today!

Tuesday, September 18, 2012

Repurposing Packaging


Just a quick tip today on repurposing your packaging.  Let's not tell my husband about this one, ok?  He's one of those guys who washes out jars and who saves every egg crate and oatmeal container because he can find something to store in it.  How many egg crates does one man need?  I'm more inclined to throw away almost all the packaging.  However, there are a few things I save.

I use the clear part of some of my packages as paint mixing trays.  This weekend I got in an order from Two Peas with some Basic Grey buttons and some Studio Calico wood veneer items.  Neither of these were put in reclosable packages so I removed them and put the buttons in my regular button storage.  For the little wood veneer stars, I used an old button/brad container from Stampin' Up!

I used the larger 'tray' above the very next day for mixing up some rust colored paint from orange and brown.  I love to work with raw chipboard, painting and stamping it to whatever color or pattern I'd like.

I have one drawer in my scraproom devoted to left over packaging so it doesn't get out of hand.  Oh, and I do keep the chipboard from paper pads and kits.  I use it for other projects and as part of my props when photographing cards and pages.

Here's a brief video on this to watch at YouTube


What do you save?

Thanks for stopping by today!

Monday, September 17, 2012

Harper House


On a date day a few weeks ago, we visited the Harper House, a local historical site.  Apparently it is a secret treasure as no one around here I've mentioned it to had ever heard of this pretty home.  The house was built in the 1800's and has been restored to its Victorian grandeur.  Most Victorian era homes I've seen have elaborate plaster or carved ceilings.  However, apparently another way homes in this time period were decorated was with wallpaper - lots of wallpaper.

I'd seen this home when it was under renovation about 8 years ago and I knew they were doing a fabulous job so I was excited to see it again.  Unfortunately, they don't allow any photos of the inside or have any posted on their own website.  Each room has all the ceiling and most of the walls covered in a variety of wallpapers.  One room has 13 papers!  None of the original furniture was left but they have brought in pieces from the time period right down to the knife rests on the dining table.  I'd never seen a knife rest either.

We were given a guided tour and learned about the homes occupants including a woman who was married 3 times - for love, for money and for the heck of it.  She was smart enough to get a pre-nup on the last one as he was a real spendthrift.  This was about 1910 so she was definitely ahead of her time.

The top floor is devoted to what was a room for partying and dancing during prohibition.  There are silhouettes on the wall of the frequent guests.  They didn't know who these people were so the Historical Society published the silhouettes in the local newspapers during restoration and were able to get identities from many of the descendants.


For the page, I wanted to give the impression of the various wallpaper designs.  I've used about 10 papers I think plus quite a few Basic Grey rub-ons.  Stickers for the title keep this an uncharacteristically flat page.

Thanks for stopping by today!  Tomorrow I have a quick recycling tip for you.

Thursday, September 13, 2012

Fall is almost here


It's been cooler and so nice this week.  Makes me remember that fall will be here in just a few days.  I did this card for our next card class.  After I got everything together, I wished I'd flipped it and put the truck part on the bottom.  So maybe we will do it that way in class.  It just seems a bit top heavy.

Do you have any special fall plans?  Any fall traditions?  I just love to see the leaves turn.

Thanks for stopping by!

Wednesday, September 12, 2012

on a Lenny Day


"Happy Crafting" is the theme of one of the Big Picture Big Ideas in their free festival going on through September 17.  The idea is to only do the parts of crafting that make you happy.  Experimenting and just having fun on your projects is suggested.  I went with this and Glitter Girl's masking lesson from last week.  This layout is my result.

To make the background, I selected lots of green and blue/green papers from my stash as these are my favorite colors.  I pulled lots of stamps, some mists, chalk, ink and one Studio Calico mask I had.  I also made some other masks using my Cricut.  I really tried to just play without too much of an idea what I was going to do.  I did plan on cutting my papers in circles but that was about all the forethought I gave it.  So did making this page make me happy?  yes and no.


Here's what I learned about my crafting:

When experimenting with techniques, monochromatic color schemes help. Then your various test will work together better.

I'm happier when I have a plan.  I can't help but feel I'm wasting supplies if I don't. While I used almost everything I stamped or masked, I didn't know that at the time.  Also, when I have a plan, I often change my mind and it sure isn't a guarantee that everything is going to get used.  The plan just helps guide me and make me feel better. So a plan makes me happy.

I didn't enjoy this quite as much because I didn't feel good.  This is obvious I guess, but then again often crafting will perk me right up. On this day though I had some aches and pains that were exacerbated by working in my craft room without knowing what I was really doing.  Not a big deal but just something I noticed.

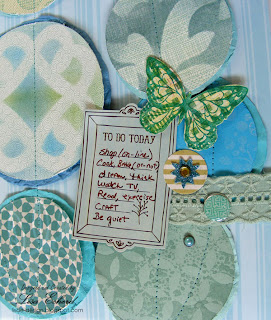
I really do enjoy masking on pattern papers. This was part of Glitter Girl's lesson.   She used very simple papers as backgrounds. Most of mine are simple but some a bit busier. I loved it all. All that visual layering is very appealing and just makes me love pattern paper all the more.

It's fun to use an old technique.  Behind each pattern paper circle is one made of crumpled cardstock. I wet the cardstock and then balled it up before spreading it out and letting it dry.  Actually I put some of it in the dryer to speed this process along. Obviously I was anxious to see how all this was going to turn out!

Sewing and embellishments save the day.  I didn't really start to like the page until I sewed down the circles.  Then I knew it could work.  I didn't start loving it until I added the trim and brads.  This page didn't need tons of embellishment but a little really boosted the effect.


The page is about a day to myself I get every now and then when my husband is away.  When he is gone I get a "Lenny day."  When I'm gone somewhere, he gets a "Lisa day."  We love our time together and we love these hours of solitude, too.


So it was all a good experiment and I captured a little of what gets done or doesn't on those Lenny days.

Thanks for stopping by!

Tuesday, September 11, 2012

Coloring Canvas


Yesterday I shared a layout with misted and stamped canvas flowers.  Today I have some cards with the canvas treated in other ways.  Part one of the video focuses on the red/orange card and flower above.   One of the flowers is colored with water based markers in a very quick technique that gives you a lot of control over where your color goes.  Another thing you can do with canvas is wet and shape the canvas to add more dimension.  (There is a loud growling sound part way through the video.  I think it is a motorcycle passing on the road.  It isn't my stomach growling :-)

Part two is the stamped butterfly card.  Working with canvas gives you a great opportunity to use chalks or pastels.

Watch at YouTube


Watch at YouTube


The Celebrate card is going to my stepdaughter for her birthday later this month.  I thought it was perfect late summer colors and she is such an upbeat person.

Thanks for watching!

Monday, September 10, 2012

A Doll ...with canvas accents


Oh, I seldom get to do pages for little girls and they are so much fun to do!  I seldom get to take a little girl shopping either.  (Yes, I know some of you might loan me and my credit card a child for the afternoon.)  On our trip, I bought Nai Nai a doll which she carefully buckled into a seat belt for the drive home and then tossed it repeatedly in the air for about a half hour showing off the doll and her acrobatics for Grampa.

For the page, I took inspiration from pages I've seen at Pamela's World of Scrap.  She often coats her brighter cardstock with white paint to create a softer surface.  This is what I did with the yellow dot paper from Authentique.  I diluted my white paint quite a bit with water and covered the middle of the paper leaving the edges as they were.

Also inspiring was a layout by Tania Willis in an old Scrapbooks, Etc. magazine from July '06.  Her page had embroidered flowers over some strips of pattern paper on the bottom portion and she had sewn circles in the 'sky' area.  I wanted to use some canvas I had from Prima from an older ArtfulDelight kit.

To color these canvas flowers, I misted two of them and inked the third by just pressing the canvas right to an ink pad.  One of the mists was Mister Huey Cameo and the other a homemade version with some Stampin' Up! Classic ink and water.  It is the center flower and I got a splotchier look.  I handstitched beside the ribbon stems and machine stitched over the papers and created waves rather than circles for my sky.

This layout combined lots of older product including the chipboards which have been in my stash for years now with newer things like the My Mind's Eye Washi tape.  I mixed old techniques of painting with new techniques of misting and was just plain fun.


Be sure to stop by tomorrow.  I continued to work with canvas and did some other projects using other techniques.  I have two videos to share.

Thanks for visiting!

Sunday, September 9, 2012

Off to the mailbox


A friend of my parents just had knee surgery.  I made this card as some happy mail for him.  His name is Bliss.  Imagine having your mother name you Bliss she gave birth.  What a wonderful name to go through life with!

Anyway, Bliss loves to spend time in his yard so I thought the little bird in the pear tree would bring a bit of nature indoors as he recuperates.  The paper is from Basic Grey's Pyrus 6x6 paper pad.  The colors are wonderful for fall.  I'm also adding this easel card to the gallery at Big Picture Classes for their fall festival.  Check out this great free event!


Big Picture Classes

I found out about this from Nichol Magourik's blog.  Each day including weekends from September 4 through the 17th is a new big idea with a challenge and prizes.  Registration is free.  Even if you don't have time to do this now, if you register, the lessons will be in your account so you can look at them later.

One little hint:  the videos are in the Archives tab which is the last one on the right after you log in.  I think this is a strange place to put the content of a class but hey, it's free!

Also, I have some Stampin' Up! Christmas stamp sets for sale:
A Cute Christmas (Stampin’ Up! clear) $10

Christmas Punch (this set was a hostess level 2 set and has hardly been used) $12

Season of Simple Grace (nativity set) $14

Please e-mail me if you are interested.

Thanks for stopping by today!

Thursday, September 6, 2012

IN there?


"We have to go IN there?" my stepdaughter asked as we approached the petting farm.  "Of course" I said.  I'm thinking, "how else are you going to pet the animals?"  But then I knew my oldest stepdaughter wasn't going to touch any 4 legged creatures.  She is not fond of animals even dogs and cats.  Her kids particularly the oldest are far more curious about all kinds of creatures.

Nai Nai is a city girl through and through.  She starts petting a goat and says "I'm petting the horse."  Dillon loved all the animals.


Since Jaime's statement was most memorable, I used it for the title and put a lot of the design emphasis there.  A few buttons helped create a visual triangle.  

Speaking of animals, Lenny weighed our feline yesterday and he now tips the scales at 17 lbs!  Can anyone say "kitty diet."  He is still pretty active at only 4 years old so we will probably just keep a check on things for now.  He is due at the vets next month and I can find out if we need to be trimming down his meals.  His last weigh in was 15 lbs but I can't remember quite how long ago that was - more than a year.  I don't look forward to having to change out his food.  Dietary changes are no fun for any creature.  Oh well, a problem for another day.

Thanks for stopping by!

Tuesday, September 4, 2012

Lacy Background using Distress Inks and Water


Distress Inks are made to work with water.  Often you can ink an image and then spritz the image with water before stamping to get a neat effect. This works best with very simple images.  I wanted to see what I could do to add some subtle distress ink colors to a detailed stamp.

I'm using a stamp from Stampin' Up!'s Lacy and Lovely set repeatedly on the background of these two cards.  With the technique in the video, I get softer colors that layer over each other beautifully.  I also wanted to try a more artsy card.  These are not always home runs for me.  I like some of the elements of the card with the washi tape and the bloomers ribbon but not really everything.  The other is my favorite.

The video shows how to get the subtle stamping and talks about what I did with the cards.  It doesn't go through every step as the assembly of the cards is pretty straight forward.

Watch at YouTube


Thanks for watching!

Sunday, September 2, 2012

Summer of Peach Love


Hi!  Hope you are having a great Labor Day weekend.  Welcome to everyone from Two Peas Labor Day Scrap and Yap thread!  I finished this layout Saturday about our current obsession with fruit.

Sometimes I think we have been drowning in fruit this summer.  This is a good thing as I started last April having smoothies for breakfast each day.  I have lowered my cholesterol nearly 30 points with my new diet!  So fruit and vegetables are seen far more in my house these days.  Right now the counter is covered in peaches.  I took these photos from an earlier batch.

Journaling:


Lenny loves peaches.  I never knew quite how much until this summer.  My parents gave him the name of a local peach grower who shares his philosophy that no peach should be picked before its time.  Soon Lenny was not only bringing home bushels for us but carting them to friends and customers, too.  The peaches got rave reviews by everyone.  Every day I’ve enjoyed fresh peach smoothies.  I’ve also made pies and even a peach and sour cream ice cream that doesn’t require an ice cream freezer for my card class.  Lenny says that putting peaches in a pie is a waste but I know none of that pie goes to waste, well maybe to a different kind of waist.


For the layout, I used some Crate Paper Pretty Party collection and some older October Afternoon. I had the matching stamp for one of the OA papers so I stamped an image on the background paper to fill out the layout some.


The lettering is Two Peas Mistable Thickers.  In this week's Glitter Girl segment, she challenged us to try the ombre trend.  First I misted all the letters in yellow and then went over part of them in a peach color mist.  I used my chalks to add the rest of the color. Chalk works great on canvas.


Thanks for stopping by!
Related Posts Plugin for WordPress, Blogger...