Pages

Tuesday, September 30, 2014

Christmas Cardmaking Weekend


I confess that I can spend a lot of time making Christmas cards.  My husband is completely baffled by this because he doesn't understand why anyone wants to send cards much less spend hours making them.  He does always make sweet comments about the cards I make and the handmade I cards I receive but he still doesn't really get it.

I've always enjoyed sending holiday cards.  I used to buy at Hallmark right after Christmas for the next year getting the prettiest ones I could afford.  Over Thanksgiving weekend, I'd handwrite all my addresses and notes for a few friends we rarely see during the year.  Just a signed greeting for everyone else.  It was part of my holiday tradition.

One year I decided to make my own and used some clipart on the front. Coincidentally the next year just before Christmas I was invited to a Stampin' Up! event. My first SU! set was Lovely as a Tree and I made my cards that year.  Every year since then I've used new stamps on my cards.

Last year by mid September, I had a bunch of Christmas cards done or in process. I'd subscribed to Raisin Boat's rental stamp program and enjoyed all kinds of fun new images.  I spent a lot of time on my holiday cards as usual.  Last year it was all about coloring as most of Raisin Boat's images are designed to color.  It was fun, I loved the cards.


This year is a little different.  I still want to make my cards and ones for my mother to send, but I don't have as much time to commit. I have many scrapbook pages I want to make and I'm doing a few mixed media projects. I'd like to complete my next e-book before the end of the year plus getting my 2104 sketchbook ready.  So, I just don't have the time to spend an hour per card or whatever it turned out to be.  So I committed to one weekend to get as many cards done as possible.

I stretched this beyond the weekend starting late Thursday and working some even yesterday.  At present I have done or in process of assembling 49 cards!  Just about a dozen to go.  I've never made that many cards in just a few days.

Another thing different about this year is that I committed to making cards from my stash.  So far I've only bought one small roll of ribbon, two Silhouette images and some adhesive.  I think I can make the remaining ones without expenditures either.  With doing more scrapping, I'm doing less cardmaking. Operation Write Home doesn't need as many cards so I have a lot of 8 1/2 x 11 cardstock - a LOT - that needs to be worked down.


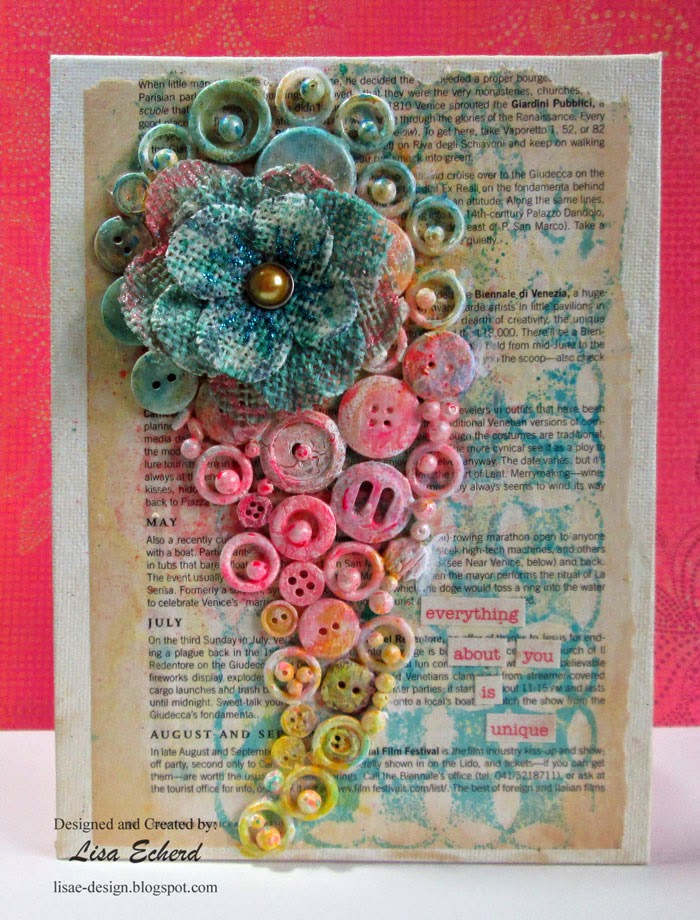
I did not video any of the card process. You should be glad I didn't for the Poinsettia card.  I only made 7 of these and they will go to 7 very special people :-)  I almost slipped into my old ways of spending hours and hours on just a few cards.  Here's the short version:  The Poinsettia is die cut from a Silhouette image and then coated with some acrylic glaze.  The background is book paper stamped with Archival Ink and treated with paints to get the effect.  The ribbon is from Hobby Lobby and another Silhouette image holds the stamped Merry Christmas.

I moved things along with the ornament card at the top of the post which uses a Silhouette image for the branch and just a little coloring and embossing.  I've used this image before but I doubt anyone will remember.

Later in the week, I'll share a couple of other designs.

Last Monday, I tagged Penny at Penny Scraps for the Scrapbooker's Blog tour.  Be sure to visit Penny and read her wonderful post about her journey in scrapbooking.

Thanks for stopping by.  Before all this card craziness, I did create and film a process video so I'll have that up tomorrow.

Friday, September 26, 2014

Layout 3 from Kit - Treasure Hunt


The main color for the kit I assembled from some Bo Bunny Enchanted Garden and lots of things from my stash is lavender/purple.  Yet, this page has none!  The papers had a fair amount of green and aqua in them.  I also used a lot of neutrals here that seemed to work with the photo and give me a background to showcase some gold touches for the 'treasure.'

My friend Karen wanted to find some small elements to use on mixed media canvases. We 'canvased' my house.  My husband even dug through the trash from his pinball repairs to provide broken parts that were perfect for her project.


Later on Labor Day weekend we hit the craft stores - Michaels, AC Moore and finally Hobby Lobby where the photo was taken at the very last minute.  (Why can I ever remember to take photos?) We dug through bargain bins and scoured the jewelry sections finding many items perfect for these canvases.  I found the hearts at AC Moore in jewelry.

The lower right corner of the page needed one final touch and that was ribbon from my kit.  It adds a different shape to the grouping.

I'm not sure which of the three pages from the kit I like best but this was the most fun to put together.  It isn't my usual style - if I have one - and that is one of the things I like best about scrapbooking.  You can do just about anything.

Here's the video at YouTube:


I did create a sketch part way into the process:


It says on the bottom Skeches class but it isn't from the class.  It was created for this page.  It also has some misting on the background that I chose not to do. This one definitely evolved as the page too shape.

If you like working with sketches or need a creative boost, check out my 2013 sketches here.

So those are the 3 layouts I planned with the kit.  I may have some more as we just took a short trip to visit some gardens in Georgia and I think I'll have photos that match these papers coming along.

Thanks for stopping by!

Tuesday, September 23, 2014

Layout 2 from Kit - Mother and Daughter


This pretty pair are my youngest stepdaughter and her daughter.  I wasn't present when the photo was taken so I don't know the story.  I decided just to capture the moment as a obviously happy time.

This worked perfectly with the kit I shared last week in this video - Kit Layout 1.  Most of the colors are lavender, blue and greens.

When I was making this page, I'd gone upstairs without my laptop and that day my knee was hurting just a bit from a slight issue the night before.  The problem cleared up quickly but I didn't want to be going up and down the stairs a lot so I used a punch in place of the die cuts I was planning to do on the Silhouette and scribbled my sketch by hand for the video.  A better version of the sketch is shown below.


Two things that have been in my stash a looong time are the purple ribbon from the dollar store and the chipboard buckle that I think I bought about 2006 or so.  The buckle wasn't quite the right color but a little white paint fixed it up.


The punch is the 2 3/8" scallop punch from Stampin' Up! and the butterflies are EK Success that were freebies in an online order.  So I used a lot of stuff from my stash to go with the Bo Bunny Enchanted Garden 6x6 papers.

Watch at YouTube:


Here's the sketch:


The September newsletter goes out tomorrow.  It includes a video for newsletter subscribers only on altering pattern paper.  Be sure to subscribe for free on the sidebar.  Hope you have a great day!

Monday, September 22, 2014

Scrapbooker's Blog Tour

Hi!  Welcome to one of the stops on the Scrapbooker's Blog Tour.  I'm honored that my friend Sue Althouse tagged me for this week.

Be sure to visit Sue's blog Life and Memories.  Sue has wonderful layouts and some great process videos, too.

So let's jump in with my answers to some questions about how I scrapbook.

1.  What am I working on right now?

I'm doing the 3rd layout from a kit I assembled using some new Bo Bunny and Prima combined with lots of stuff in my stash.  The kit is very girly with lavender, blue and green.  The 2nd layout video should be up this week here on the blog.


2.  How long does it take me to create a project?

I seldom do a page start to finish in one sitting.  Often I layout materials late in the day and create the sketch.  Then the next morning when the light is wonderful in my scraproom, I do the majority of the page.  Often I like to mull over aspects of the design.  It helps so much to walk way - or in my case go downstairs - for awhile and then return.  I also use mists, paints and other mediums that need a little drying time.  Actual time from start to finish can be anywhere from 1 1/2 to 3 hours if you count creating the sketch and fiddling with the video.  Editing and posting the video takes another hour and half or so.  I'm not a speedy scrapper and that is fine with me. I love the creating process.

3.  What are my favorite things to create with at the moment?

Stencils!  Surprised?  Probably not as I just did an entire class on them.  If you would like to do more with your stencils or have been wanting to try them, check out my class here on the Class Page.  It is so great to use all my inks, mists, paints and other products as well.

I still love wood veneer and chipboard.  I love things I can recolor and customize.


4.  How does my writing/creating process work?

For me, the page helps tell the story so I rely heavily on the photo and what I know is going on to select papers and embellishments that will put the viewer in that moment.  So I start with the photo and story and build from there.  Once in awhile, I'm product driven just because I want to use something in particular.

5.  How do I become inspired and stay inspired?

For the last year and half, I've been committed to doing at least one video for my YouTube channel and often more per week.  All the wonderful comments I receive are very motivating. Thank you!

I used to do a lot of challenges and I've fallen out of that habit.  Many of the sites that had regular challenges have gone away and I haven't sought out others.  I should find some other challenges or maybe start my own ?  What do you think?  Do you like challenges?

Anyway, I loved doing challenges as they make me stretch myself and often get favorite page as well.

6. What is my signature style?

This is the hardest question.  I'm all over the place, I think.  One of the things I love most about scrapbooking is that you can do anything - really just about anything to a page and make it so it still fits in your album and you are fine.  So I really love playing with different techniques and styles.

There are though some common characteristics I see in my pages - I work to the edges and don't leave a lot of white space. I love color and am challenged by neutrals.  I've done more one photo pages in the last couple of years but I still do more 2+ photo pages than anything.  All the letters of each word in a title will be the same Thicker or die cut.  I'm more of a 'b' side scrapper though I'm not afraid to stencil on those papers.  I also love texture and will add some ribbon, wood veneer, paint, brads and lots of different types of materials.

So there you have a little about me and how I work.


To continue the tour, I have tagged Penny Grimsley at Penny {Scraps} Penny has a wonderful writing style and I'm sure you will enjoy her blog.  Visit her today and be sure to see her next Monday, September 30 when she asnwers the questions as well.

Thanks for stopping by!  My September newsletter goes very soon so if you aren't a subscriber, you can put in your e-mail on the sidebar.  It's a free monthly newsletter with a tip and an exclusive video.
       

Thursday, September 18, 2014

An Artsy Mini of Quotes


Back at the beginning of summer, I did a short promo video talking about what I wanted to do this summer - basically using all the stuff I've collected. One of the things I wanted to use was a small Bo Bunny chipboard mini.  I bought it along with a larger one I did for my Mother of her older photos.

Being such a small size, I was stumped on what to do with it. I asked on a message board and someone suggested mixed media.  I'd been thinking it would be fun to do something like this without much of a plan.  Just play.  I couldn't figure out what photos to use so I didn't use any.  I used quotes.  I found them on Pinterest.  They are things that speak to me right now.

So here are some of the pages.  There's also a video showing how I did many but not all of the pages. It goes at a faster pace than most of my videos.  It isn't super detailed but shares many of the processes.  And there are plenty of photos at the end.  Here are a few.


At the beginning, I shared several stamps I planned to use.  It was really the stencils I reached for over and over. the Be Free page uses a mix of gelatos and modeling paste.


This is my favorite page.  The border is made up of clear Stickles alternated with silver Perfect Pearls.  It was so easy and has a pretty overall look.


I did do a little stamping to create these leaves and flowers.


Here are those odds and ends Thickers!  I just can't seem to make myself mix them up like this on a scrapbook page.


The background here didn't quite go like I wanted so I stenciled over some gesso to fix it.


The yellow modeling paste was left over from one of the other pages.

And here is the video on YouTube:


For more on the new Scrapbooking with Stencils class, click here.

So I have this by my bedside so I can look at quotes.  It was a fun and freeing project.  Thanks for stopping by!

Wednesday, September 17, 2014

Assembling a Kit


I'm not a kit scrapbooker.  I've tried.  I subscribed to a kit club a couple of years ago for several months.  While I enjoyed working with some embellishments I probably would never have bought on my own, I found many of the items just didn't work with my photos.  I'm very photo and story driven when selecting products.

Plus I LOVE shopping my stash.

However, I sort of stumbled into making up a kit.  I had a few products from Bo Bunny and Prima that I bought to go together in lavender, green and blue colors. I've had them a few months and finally matched them up with a photo that has been laying around my scraproom for weeks. Like the perfect couple that just keep missing each other, the photos and papers had never been on my worktable at the same time.  They are a good match both in color and style for the photo.

Just about that time I was sorting some new photos and found 2 more in need of the elusive lavender colors so I thought I'd just pull some more product to go with what I had and soon had a kit.

So this is the first of 3 videos.  In this one, I show the products for the kit and then create the first page shown above.  Next week and soon after I'll have two more pages using this kit.  Maybe more, as we took photos on a recent trip that might match up as well.

The selfies above were made at the cosmetic counter of a local department store.  I hate to admit that it has been at least 10 years since I had a full makeover - (hanging head in embarrassment).  I've bought a few things here and there but I knew I was out of style and out of range of my age.  Time for an update.

So I went back in June and got a new look. I was mostly wanting eye makeup and I love what she did.  It doesn't show in this photo but I still can remember the experience.  Often my albums are like almanacs so years from now when I'm wondering just how long it has been since I updated my look, I'll know.

For the page, I used two different papers from the 6x6 pad and some different background papers to emphasize the contrast in Before and After.  It isn't a drastic change but a more 'turning up the color.'  I also used a stencil and craft paint.


For more on stenciling on your pages, check out my new class - Scrapbooking with Stencils.  You can use stencils with lots of supplies you probably already have to add a lovely layer to your pages.

Watch at YouTube:


Here's the sketch:


I had this doily in my stash that really plumped up that fabric flower embellishment from Prima.


I like my new look when I have it on.  I don't wear makeup every day.  I'm perfectly fine with trotting out to Walmart in old shorts and a t-shirt and no makeup.  I hope to never get ambushed and put on that "What not to wear" show.  I really do have nicer clothes and dress for most appointments and other outings.  I'm just not too worried about being seen in public without mascara.

Monday, September 15, 2014

It's here!

My latest class

Scrapbooking with Stencils...


is open for registration!   This is a self-paced class filled with inspiration and techniques.

Stencils have been around for a long time.  The scrapbooking industry has really embraced them in the last couple of years with many of the manufacturers - Hero Arts, Prima, Ranger, Jenni Bowlin - adding stencils to their lines.  Crafter's Workshop also offers dozens of designs from wonderful artists.  And you can also make your own or use many found objects as stencils.

See how to use stencils in your scrapbooking along with many products you probably already have in your stash - mist, inks, craft paint and lots more!

Discover multiple ways to use the same stencil to stretch your budget.
Learn what to look for when purchasing stencils.
Find out how to cut your own stencils on your Cricut or Silhouette.
Learn tons of techniques with all kinds of mediums to make your pages even more beautiful and interesting.
Stretch your supplies and your imagination.

Included are
  • 9 videos totally over 4 hours of video techniques and information.
  • 8 layouts from start to finish.
  • PDF files for all lessons.
  • 7 brand new page sketches.
The introductory price is just $20 USD.

Register for this class on the class page here.

I'm very excited to share these ideas with you.  Thank for stopping by today!

Friday, September 12, 2014

Buttons and Pearls


When my friend Karen visited over Labor Day, she was on the hunt for small items to go on mixed media canvases.  I watched one of the videos she had seen and was also bitten by this bug.  I doubt if I'll ever do an all over canvas the way the presenter - Einat Kessler - did but I wanted to give the technique a try.  Here is her video.

My impression at first was this was awfully tedious. While I was making good progress with an overflowing button stash and using some pearls that have been around probably since before my scrapbooking days, it was just taking a long time to get my design down.

When I started putting on color, I started having more fun.  In the video, Einat uses mists.  I have no permanent mists and wanted to be able to go back over this with Mod Podge so I used gelatos on top of my gesso.  They give great color and the metallics add some shine.


After this experiment, I can definitely see adding this techinque in small quantities to canvases.  You can use all kinds of small trinkets even things that would normally be trash so it feels good to repurpose and get something beautiful.

Thanks for stopping by!

Tuesday, September 9, 2014

Next stop...Texas


We aren't going to Texas anytime soon that I know off.  Too bad, as I always enjoyed my trips to Dallas/Ft. Worth.

This photos was taken Fourth of July weekend in 1993.  We were at my parents vacation condo.  If I hadn't written the date on the back, I would have just assumed it was any ordinary weekend there. This one was special.

In May of that year, we moved into our new house - my lifelong dream.  In June, Lenny's youngest daughter came for her annual visit and stayed a month. The two of them vacationed in Florida.  All was great.  Then we found out Lenny was to go to Texas for a 3 month contract.  That was longer than normal but workable.

So we decided to go to Gatlinburg for the 4th.  I'd drive back home after the weekend and he would go on to Texas.  I packed his clothes and things for this 3 month contract. When we go to the office, we found out he would be gone for 6 months!  I remember being very aggravated that no one had told me because it was a long time and also because I hadn't packed him any winter clothes. Oh, the funny little things you remember.

Anyway, the weekend this photo was taken was the last we would have together for several weeks until I could visit him.  He returned home a couple of times for visits, too. However, his Mother became ill and died that fall so he spent time in Missouri as well.

For the life of me, I can not figure out who took the photo.  Amanda must have flown home.  I don't remember her going to Gatlinburg with us.  It was far too long ago for us to have a camera that did timed photos and we never get one this good on our own even with a digital camera.  So I'm stumped but I'm glad I have the photo.  I scrapped these events long ago.  It is nice to remember them again.

For the page, I used Crafter's Workshop Striped Explosion stencil.  I like this design but don't care for the necessary frame around it so I used a mask to cut that part out.


The embellishments were ones I'd made up and had in my stash.

More on this is on the video at YouTube:


Here is the sketch:


More sketches are in my new class Scrapbooking with Stencils coming in just a few days!  More about the class here.

Monday, September 8, 2014

A Special Announcement!

Coming next week, I'll have a brand new class...

Scrapbooking with Stencils

Why have I fallen in love with stencils?

They are so versatile. I use them on all kinds of projects including my scrapbook pages.

Stencils are inexpensive and take up almost no space.  It isn't just the cost of our supplies but often the space that is an issue.  I have all my stencils in one drawer with plenty of room leftover for more.

Stencils are a stash stretcher.  You can dust off those ink pads, mist bottles, paints, chalks and pretty much anything that creates color and really use your supplies in a fresh way.

And the biggest reason I love working with stencils is they are FUN!


In this class, I'll show you how to use stencils on your scrapbook pages. We will create artistic pages. and regular multi-photo pages.  They fit right in with all kinds of scrapping styles and add an extra layer of color and texture to your pages.

This very technique driven class contains:
  • 25 techniques for adding color and design to your pages
  • instructions on how to use ink pads, paints, mists and many other supplies you already have in a brand new way
  • suggestions for what to look for when purchasing stencils and suppliess
  • settings for cutting your own stencils with a Cricut or Silhouette.
  • 9 HD video based lessons with over 4 hours of content
  • 9 PDF files with supply lists, sketches and extra tips
  • 7 brand new page sketches


The introductory price for the class is just $20.  I hope you will join me when registration opens ...

Monday, September 15

The class is self-paced so you can watch the videos whenever you wish.  I'll check the message board often for questions.

I'm very excited about this class and I'm looking forward to next Monday!  I hope you will be, too.

Friday, September 5, 2014

I've been so good...

... so good to use my stash this summer.  I deserve a little retail therapy, right?

My paper stash was actually getting a little thin so I've picked up a few collections to finish out summer and move into fall.  There is some new Carta Bella fall collection along with a VERY bright Lemonade Stand from Bo Bunny. I foresee a 'how to tone down your paper' video in our future with that last one.

Most of this is from Acherryontop.com.  Karen was visiting over Labor Day and we hit all the craft stores in our area so a couple of items are from them. Mostly I bought canvases at Michaels as they had a very good deal.  At the rate I go on those, I probably have enough to last until next spring.

Here's a look at my new papers and things on YouTube:


Thanks for visiting today!  My new class Scrapbooking with Stencils will be up soon!  Look for an announcement in the next few days.

Tuesday, September 2, 2014

Journal Cover, Silhouette File, Video

 It's that time again!  I've gone through another notebook.  I use them for to-do lists, lists of things I've done, class ideas, etc.  My favorite style is the Mead Cambridge business notebook that is 9 1/5" long and 5 3/8" wide.  I have only found this particular one at Office Max.

With so many people going back to planners, I did revisit the idea of using a Daytimer or some other planner system again.  I lived by my Daytimer in the 90's and early 2000's but my life has changed.  I have far fewer appointments but just as many lists if not more.  So I needed to stick with something more free form.


Typically, I use a hole punch to do the front cover to fit.  I've done a couple of popular videos on this before.  Here is the basic one: 

This year though it dawned on me that I have an electronic die cutter that could cut out all those little holes and slits for me.  The crop-a-dile will cut through anything but it is tedious compared to putting a paper on a mat and pressing a button.  So after a couple of fits and starts, I set up a Silhouette file to do a cover.  It is a dream!  


Fortunately, the Silhouette software uses a lot of the same conventions as PowerPoint so it was fairly easy to get it to do what I told it to.  It makes me want to create some other files for different kinds of notebooks.  Hopefully, I'll get to that soon.  Right now I'm still busy getting the video editing for the Stencil class coming up.  With concentrating on that, I won't have a scrapbook process video this week.  I do have a video below on the notebook cover.  Here is an inside view of the notebook.


And here is the video at YouTube:


If you happen to use this style of notebook, here is the Mead Cambridge Notebook Cover Silhouette file.  You may download for personal use.

Thanks for stopping by!


Related Posts Plugin for WordPress, Blogger...